Provision Maintenance
Table of Contents
- Navigating to Versions
- Staffing (Test)
- Adding a Provision
- Modifying a Provision
- Deleting a Provision
Download (PDF) Permanent Budget Transaction Training.
Navigating to Versions
Versions not only enable users to view data, but are also the vehicle by which records are added, modified or deleted within FMW Web. In order to perform any transactions, you must first navigate to the versions module within FMW Web.
Upon successful logon to FMW Web, the Application Launcher window appears as shown below. All highlighted modules on the application launcher are modules to which you have access.
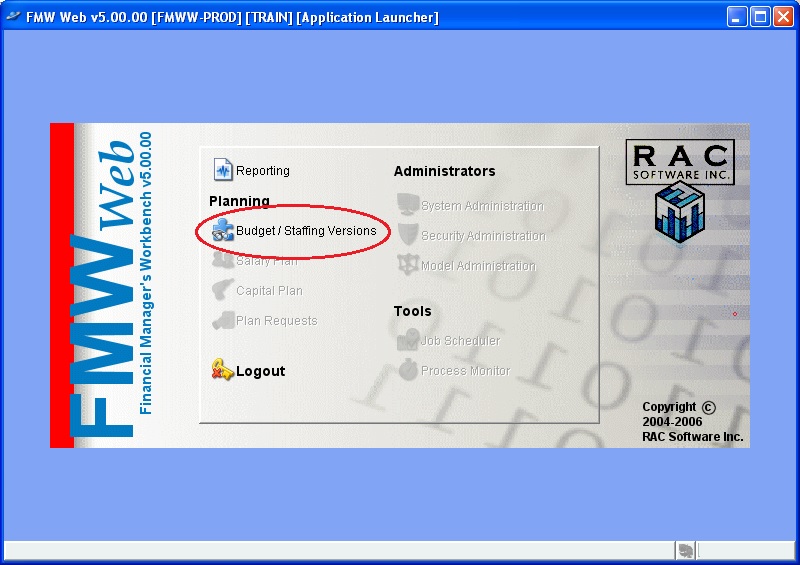
Click on the Budget/Staffing Versions link to navigate to the version module as shown below.
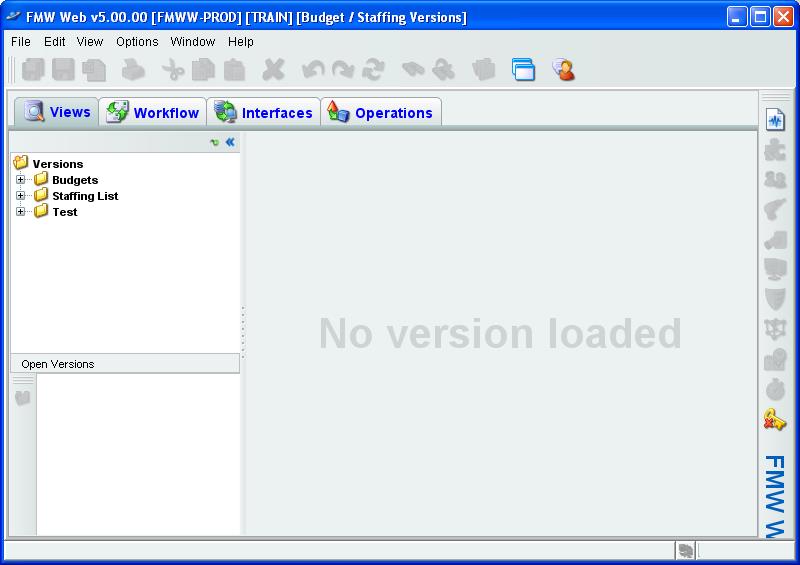
Under the Views tab, expand all version folders by clicking on the ‘+’ in the version navigation pane. The screen below shows all versions that exist in FMW Web. Once you’ve completed this training, you’ll need to know where to find the production counterparts to the test versions you currently have available.

Take note that despite the presence of multiple tabs within the Budget/Staffing Versions window, only the Views tab is relevant for non-admin users of FMW Web. You should also be aware of the following generally available functions within FMW Web:
- Clone application
 icon opens another instance of FMW Web in a separate window allowing a user to have the Reporting module open concurrently with the Budget/Staffing Versions module.
 - Messenger
 icon allows users to instant message other FMW Web user currently logged in.
 - Reporting
 icon first will completely close the Budget/Staffing Versions module, and then opens the Reporting module.
 - Logout
 icon closes the current module. Any other instances of the application opened via the ‘clone application’ function will remain open.
 - In the upper right corner of the versions navigation pane there exits two icons. When the
 icon is active, by default the navigation panes remain visible upon opening a version. Clicking on this icon turns the icon to
  . When the icon is active, by default upon opening a version the version’s balance view will expand to occupy the entire Budget/Staffing Versions window, thereby hiding the navigation panes. The
  and
and  icons are then used to hide/unhide the versions navigation panes as needed.
Staffing (Test):
The Staffing List consists of three components: payroll, provisions and the permanent budget. The basic concept of the Staffing List remains unchanged – the campus is required to balance the permanent staffing commitments (payroll and provisions) with the permanent staffing budget. The Academic and Staff versions are very similar to each other. The primary differences are as follows:
- The Academic version is restricted to pool account B00000 “Academic Salaries” and the Staff version is restricted to pool account B01000 “Staff Salaries”.
- The campus must balance the Staffing List twice a year – as of 12/31/yyyy and as of 7/1/yyyy. The payroll (PPS) extract for both versions is updated nightly. For both the 12/31/yyyy and the 7/1/yyyy balancing, the Staff version requires that a PPS record has an appointment-distribution that encompasses July 1st of the current permanent budget year (i.e. 7/1/2010), whereas the Academic version requires that a PPS record has an appointment-distribution that encompasses June 30th of the current operating year (i.e. 6/30/2010). The Academic version will shift to the July 1st selection criteria once it’s determined that most of the academics with two-year appointments that will be extended have been extended.
- Provisions related to ladder-rank faculty and security of employment lectures are slightly more regulated than provisions in the Staff version. Additionally, Campus policies govern academic turnover savings and upgrades, see http://planning.ucsc.edu/budget/policies.asp for more details.
We’ll be focusing on the Staff version in this training manual, while pointing out where items differ within the Academic version.
From the Views tab in the version navigation pane expand the Test folder. Double click on Test Staff to open the version’s balance view. Please note that the Test Staff has been added to the Open Versions pane (5) below.
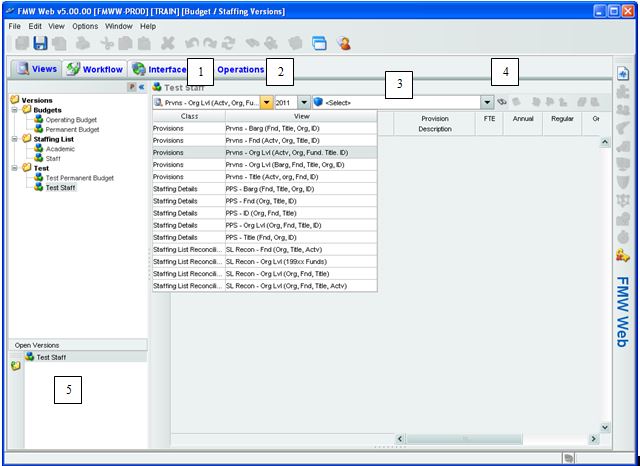
- Editing View – Users select from a pre-defined list of how they wish to view data, in this case, the Test Staff - Provisions. Within the staffing versions, you can select to view the provision (Prvns…) component of the staffing list, the payroll (PPS…) component of the staffing list, or the actual complete staffing list reconciliation (SL Recon…) that incorporates all of the essential components including the permanent budget. Each of these different types of views (or classes) within the staffing version has its own combination of elements as well as different data columns. Only the provision component of the staffing list is directly updatable via the staffing versions. The payroll and staffing list reconciliation components are ‘view only’ within the staffing versions. The naming convention for editing views after indicating the component of the staffing list is similar to the convention used in the permanent budget version: First is an indication of either the element or hierarchy that will be used to query the database, and then in parenthesis an indication of the sort order of the view.
- Fiscal Year – FMW uses the same fiscal year convention as FIS Banner. For example, year 2011 denotes FY 2010-2011. The Test Staff version contains only a few years of data – currently 2008 onward. The production Staff and Academic version has years 2002 onward.
- Select Data – Depending on the editing view selected, users are able to select an organization, organization tree node, fund, etc. by clicking on the drop-down box and expanding the Org or Fund tree. Note that data entry elements are available within these trees.
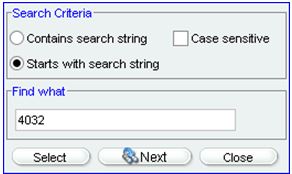
- Search List
 icon – Allows users to search based on selected search criteria. For instance, selecting “Starts with search string” in the search criteria and entering ‘4032’ will look for the first element/tree id that starts with ‘4032’.
- Open Versions Pane – Displays all open versions during the active session. Select a displayed version to navigate to that version, or use the Close
 icon within the pane to exit the version.
Once an element or chart tree node is selected in the Select Data box (3), the balance view is populated with data.
- The Key Element Region shows the remaining elements that make up a unique record within a particular editing view. This region appears in blue below.
- The Data Column Region is where the figures relevant to your selected editing view and data selection will appear, see below.
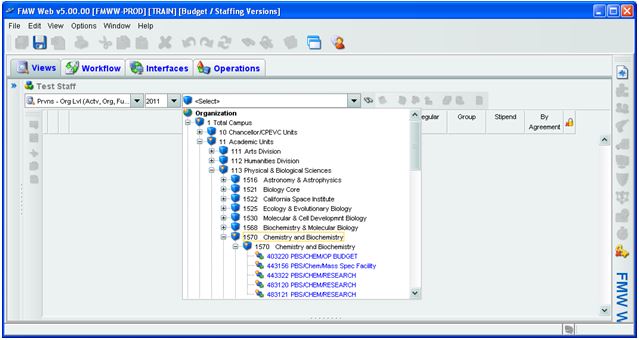
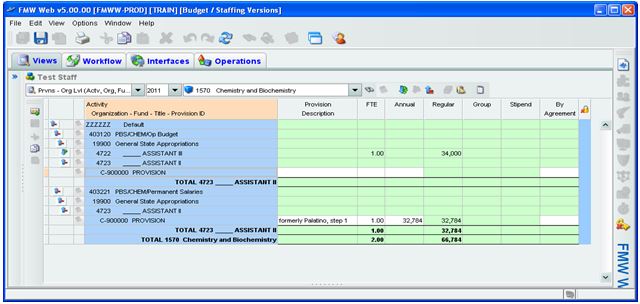
Select the ‘Prvns – Org Lvl (Actv, Org, Fnd, Title, ID)’ editing view, current permanent budget year (i.e. 2011) and an org/org level of your choosing – TRAIN has chosen org level 4 = ‘1570’. Your screen should appear similar to the one below.
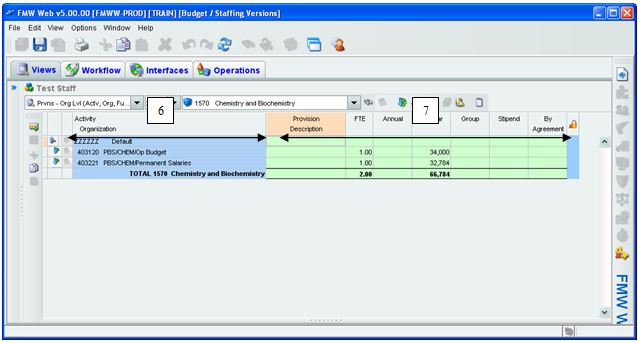
If we’re interested in greater detail on the provision held on org 403221, we can go to the left of the record and click on the Expand icon ![]() . This action will drill-down to the next level of detail. Continue to expand until you get to the lowest level detail showing Provision ID.
. This action will drill-down to the next level of detail. Continue to expand until you get to the lowest level detail showing Provision ID.
Notice that the data column cells for the columns ‘Provision Description’, ‘FTE’, ‘Annual’ and ‘By Agreement’ are white – meaning that these cells can be directly updated by users with appropriate access.
To collapse the lines, click the Collapse icon to the left of the line ![]() , see (1) below. Alternatively, rather than expanding/collapsing one data record path at a time, you can utilize the Expand/Collapse icons on the balance view toolbar, see (2) below.
, see (1) below. Alternatively, rather than expanding/collapsing one data record path at a time, you can utilize the Expand/Collapse icons on the balance view toolbar, see (2) below.
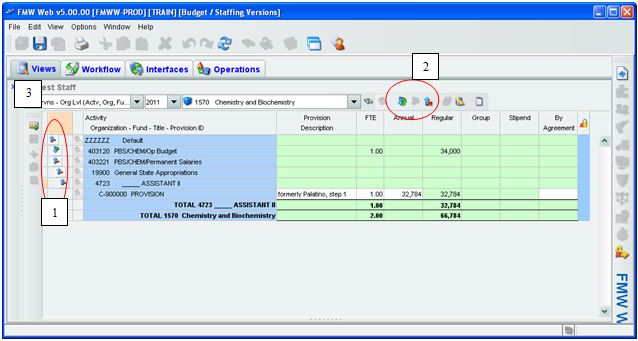
Note that the insert row ![]() icon above (3), initiates the creation of a new provision record.
icon above (3), initiates the creation of a new provision record.
Note that a default/blank/null Activity code is denoted by ‘ZZZZZZ’
Note that the printing function ![]() is enabled on the balance view. Users can manipulate column widths prior to printing so as to maximize the quality of the print job. The print date is indicated on the Editing view printout.
is enabled on the balance view. Users can manipulate column widths prior to printing so as to maximize the quality of the print job. The print date is indicated on the Editing view printout.
Adding a Provision:
Using the above ‘Prvns – Org Lvl (Actv, Org, Fnd, Title, ID)’ editing view, current permanent budget year (i.e. 2011) and the org/org level of your choosing (TRAIN chose org level 4 = ‘1570’), let’s add a _Assistant II provision to the Staff version on 19900-403120.
With any cell selected within the balance view, click the insert row ![]() icon to initiate the creation of a new provision record with the screen below.
icon to initiate the creation of a new provision record with the screen below.
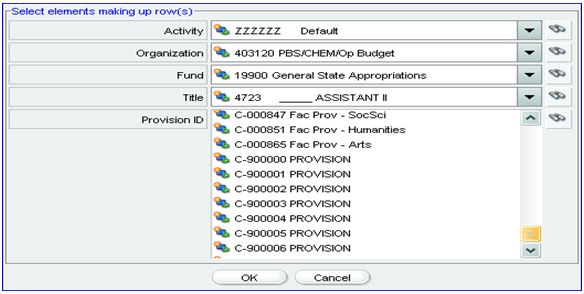
Select the elements making up the provision record desired. Each element has a corresponding drop-down list as well as a ![]() function. Click ‘OK’. The record is automatically inserted appropriately in the balance view, as shown below.
function. Click ‘OK’. The record is automatically inserted appropriately in the balance view, as shown below.
When working with the Staff version, the Provision ID list is best dealt with by taking hold of the scrollbar button and dragging it to the bottom. This may be the quickest way to reach the ‘generic’ IDs that are the only Provision IDs relevant to the Staff version.
The generic provision IDs begin with either a ‘C’ (covered), ‘S’ (supervisor) or ‘U’ (uncovered) denoting the intended Appointment Representation Code (AREP) of the position followed by a 90000x number.
The AREP indicator combined with title code determines the bargaining representation of the open provision. An AREP of ‘S’ or ‘U’ will characterize the open provision as ’99 Non-Represented’, possibly overriding the Title Unit Code (TUC) associated with the title code. Typically, the use of AREP ‘S’ is required only to denote a supervisory position within a normally represented title code. Likewise, the use of AREP ‘U’ is required only to denote a confidential position (e.g. in Labor Relations) within a normally represented title code.
For our _Assistant II example, we chose an AREP indicator of ‘C’. Note that there are seven generic provision IDs to choose from; we selected ‘C-900000’. Provisions attached to a given organization/fund/title combination must have unique provision IDs. Multiple generic provision IDs allow for multiple individual provisions to be assigned to the same organization/fund/title combination.
Academic divisional users will have noticed faculty provision IDs. Every permanent ladder-rank faculty and security of employment (SOE) lecturer has a meaningful provision ID number. When one of these individuals separates from the University, their provision ID number is used to establish the open provision within the Academic version. Non ladder-rank faculty/SOE lecturer provisions utilize the generic provision IDs numbers discussed above.
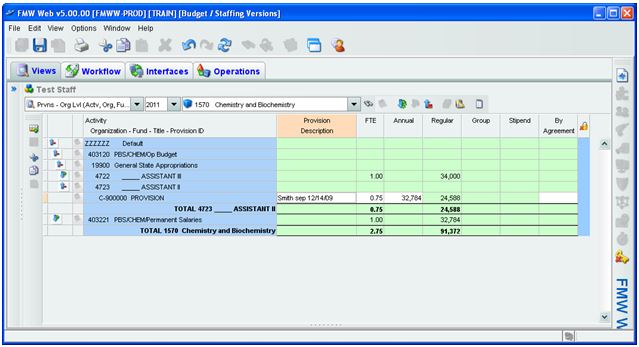
After selecting Provision ID ‘C-900000’, enter .75 in the FTE column and $32,784 in the Annual column. You can also add a description to the provision record. Try to limit yourself to 25 characters; otherwise, the note may become difficult to read on reports. Your screen should look similar to the screen below.
Save your new provision addition with the ![]() icon on the main toolbar. If you do nothing else, this addition will post overnight to the staffing list reconciliation view and staffing list reports. If you wish to view the addition immediately, you need to click the Execute Add-in Routine
icon on the main toolbar. If you do nothing else, this addition will post overnight to the staffing list reconciliation view and staffing list reports. If you wish to view the addition immediately, you need to click the Execute Add-in Routine ![]() icon and click on the “Staffing List – Load Provisions” procedure. This will take a few seconds to run, but your provision addition/changes will now be fully posted.
icon and click on the “Staffing List – Load Provisions” procedure. This will take a few seconds to run, but your provision addition/changes will now be fully posted.
The amount entered in the Annual column is based on a full 1.00 FTE. Note that the Regular column calculated the ‘Net Provision Amount’. The FTE % determines where the ‘Net Provision Amount’ will appear. When FTE is equal to zero, it will appear in the Stipend column. When FTE is greater than zero and equal to or less than 1.00, it will appear in the Regular column. When FTE is greater than 1.00, it will appear in the Group column. Because the logic for a By Agreement provision is the same as for a Stipend provision, By Agreement provisions are manually entered into the By Agreement column, which will clear the Stipend column.
On the Staff version, Planning and Budget requires only that step-based provision amounts are on step and grade based provision amounts are within the minimum and maximum of the respective grade. However, divisions may have locally defined policies regarding the establishment of provisions.
On the Academic version, ladder-rank faculty provisions may not be established above Professor I and must be on step.
At this point in time, Planning and Budget is responsible for making range and range/parity adjustments to provisions. Please do not unilaterally range adjust provisions.
Modifying a Provision:
Using the ‘Prvns – Org Lvl (Actv, Org, Fnd, Title, ID)’ editing view and current permanent budget year, fully expand the provision record to the lowest level detail showing Provision ID and white, editable cells in the ‘Provision Description’, ‘FTE’, ‘Annual’ and ‘By Agreement’ columns. Modify editable cells as desired.
Save your modifications with the ![]() icon on the main toolbar. If you do nothing else, the modifications will post overnight to the staffing list reconciliation view and staffing list reports. If you wish to view the change immediately, you need to click the Execute Add-in Routine
icon on the main toolbar. If you do nothing else, the modifications will post overnight to the staffing list reconciliation view and staffing list reports. If you wish to view the change immediately, you need to click the Execute Add-in Routine ![]() icon on the balance view toolbar and click on the “Staffing List – Load Provisions” procedure. This will take a few seconds to run, but your provision changes will now be fully posted.
icon on the balance view toolbar and click on the “Staffing List – Load Provisions” procedure. This will take a few seconds to run, but your provision changes will now be fully posted.
Deleting a Provision:
In order to delete an open provision, you need to set the amounts in both the ‘FTE’ and ‘Annual’ columns to zero, click the Execute Add-in Routine ![]() icon and click on the “Staffing List – Load Provisions” procedure.
icon and click on the “Staffing List – Load Provisions” procedure.
Deleting a provision does not require first saving ![]() the changes to zero amounts and the undo
the changes to zero amounts and the undo ![]() function is not available.
function is not available.
