Permanent Budget Transactions
Table of Contents
Download (PDF) Permanent Budget Transaction Training.
Navigating to Versions
Versions not only enable users to view data, but are also the vehicle by which records are added, modified or deleted within FMW Web. In order to perform any transactions, you must first navigate to the versions module within FMW Web.
Upon successful logon to FMW Web, the Application Launcher window appears as shown below. All highlighted modules on the application launcher are modules to which you have access.
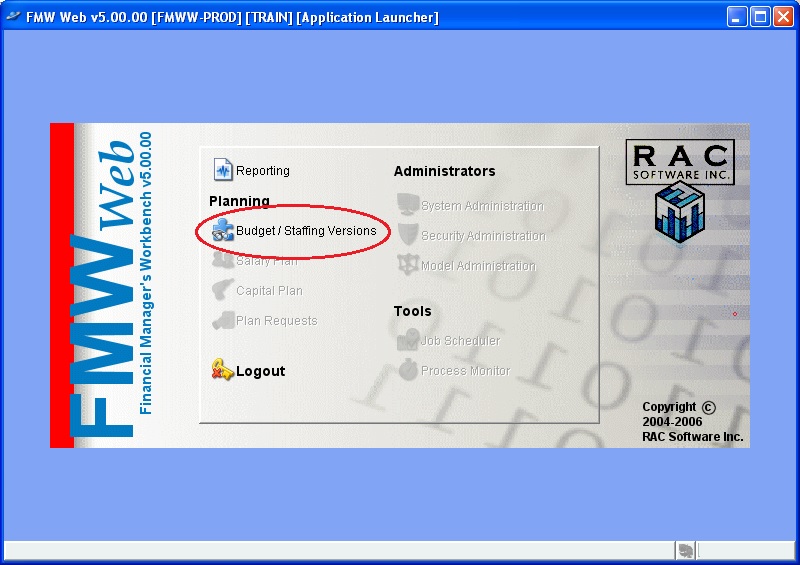
Click on the Budget/Staffing Versions link to navigate to the version module as shown below.
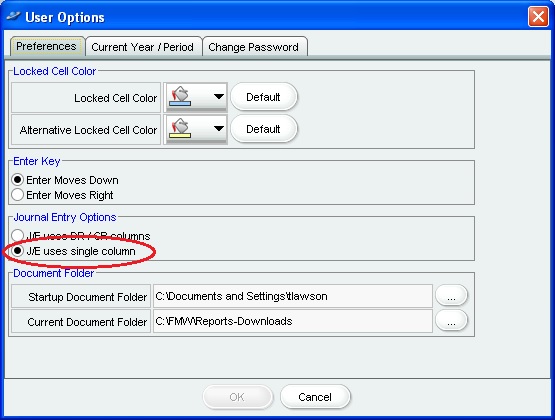
The first time you navigate to the versions module ensure that your permanent budget journal entry screen will utilize our campus’ ‘+’ / ‘-‘ convention within a single amount column, rather than the default Dr/Cr column convention. From the main menu, select Options/User Options, and on the Preferences tab select the Journal Entry Option “JE uses single column”. Click OK. You should only have to set this option once.
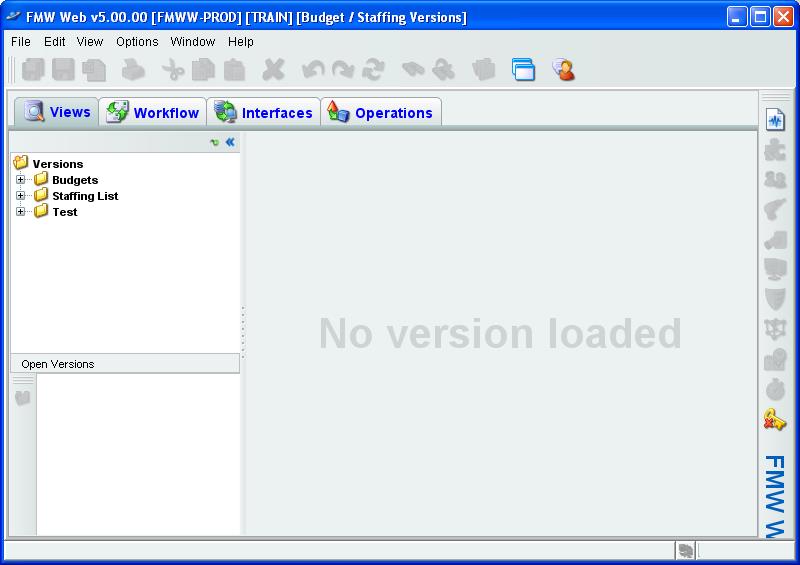
Returning back to the Budget/Staffing Versions window under the Views tab, expand all version folders by clicking on the ‘+’ in the version navigation pane. The screen below shows all versions that exist in FMW Web. Once you’ve completed this training, you’ll need to know where to find the production counterparts to the test versions you currently have available.

Take note that despite the presence of multiple tabs within the Budget/Staffing Versions window, only the Views tab is relevant for non-admin users of FMW Web. You should also be aware of the following generally available functions within FMW Web:
- Clone application
 icon opens another instance of FMW Web in a separate window allowing a user to have the Reporting module open concurrently with the Budget/Staffing Versions module.
 - Messenger
 icon allows users to instant message other FMW Web user currently logged in.
 - Reporting
 icon first will completely close the Budget/Staffing Versions module, and then opens the Reporting module.
 - Logout
 icon closes the current module. Any other instances of the application opened via the ‘clone application’ function will remain open.
 - In the upper right corner of the versions navigation pane there exits two icons. When the
 icon is active, by default the navigation panes remain visible upon opening a version. Clicking on this icon turns the icon to
  . When the icon is active, by default upon opening a version the version’s balance view will expand to occupy the entire Budget/Staffing Versions window, thereby hiding the navigation panes. The
  and
and  icons are then used to hide/unhide the versions navigation panes as needed.
Permanent Budget (Test)
From the Views tab in the version navigation pane expand the Test folder. Double click on the Test Permanent Budget to open the version’s balance view. Please note that the Test Permanent Budget has been added to the Open Versions pane (6) below.
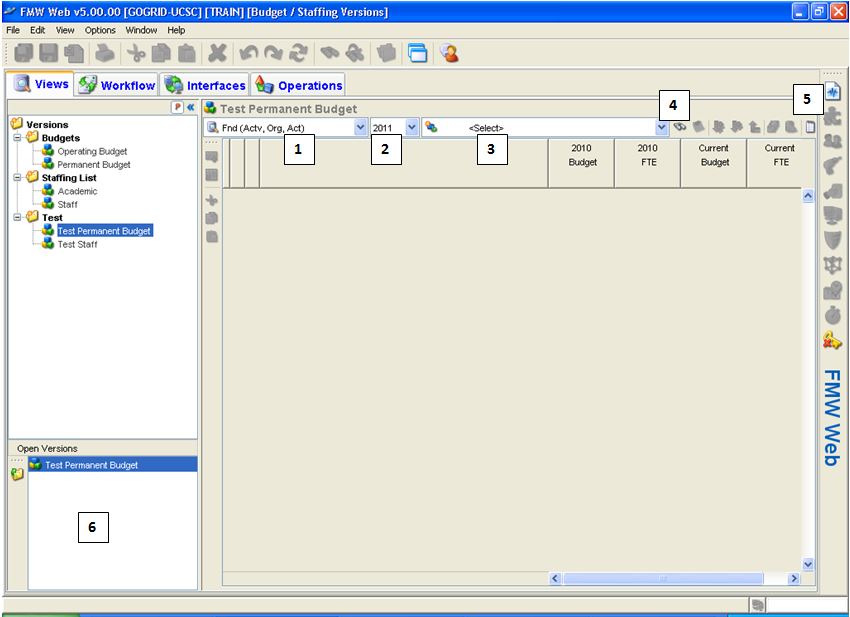
1. Editing View – Users select from a pre-defined list of how they wish to view data, in this case, the Test Permanent Budget. The naming convention for editing views within the permanent budget is as follows: First is an indication of either the element or hierarchy that will be used to query the database, and then in parenthesis an indication of the sort order of the view, or possibly other pertinent information like whether only revenue and recharge accounts will be returned.
2. Fiscal Year – FMW uses the same fiscal year convention as FIS Banner. For example, year 2011 denotes FY 2010-2011. The Test Permanent Budget version contains only a few years of data – currently 2008 onward. The production Permanent Budget has years 1999 onward.
3. Select Data – Depending on the editing view selected, users are able to select an organization, organization tree node, fund, etc. by clicking on the drop-down box and expanding the Org or Fund tree. Note that data entry elements are available within these trees.
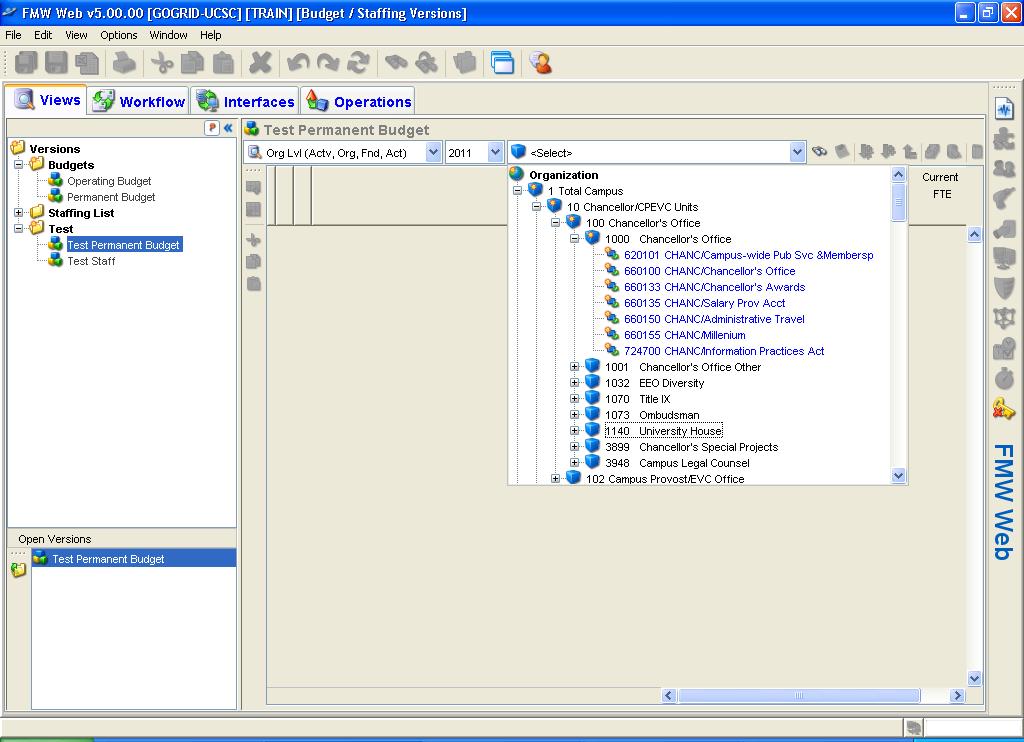
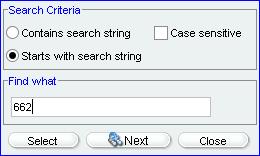
4. Search List ![]() icon – Allows users to search based on selected search criteria. For instance, selecting “Starts with search string” in the search criteria and entering 662 will look for the first element/tree id that starts with ‘662’.
icon – Allows users to search based on selected search criteria. For instance, selecting “Starts with search string” in the search criteria and entering 662 will look for the first element/tree id that starts with ‘662’.
5. Switch to Journal Entry ![]() icon - Clicking this icon will bring you to the Journal Entry screen.
icon - Clicking this icon will bring you to the Journal Entry screen.
6. Open Versions Pane – Displays all open versions during the active session. Select a displayed version to navigate to that version, or use the Close ![]() icon within the pane to exit the version.
icon within the pane to exit the version.
Once an element or chart tree node is selected in the Select Data box (3), the balance view is populated with data.
7. The Key Element Region shows the remaining elements that make up a unique record within a particular editing view. This region appears in blue below.
8. The Data Column Region is where the figures relevant to your selected editing view and data selection will appear, see below.
- Colored cells cannot be directly updated. All the data columns in the permanent budget appear as colored because updates to the permanent budget require the use of the J/e screen. Cells in white allow direct update.
Select the ‘Org Lvl (Org,Fnd,Act,Actv)’ editing view, year 2009 and an org of your choosing – TRAIN has chosen 403120. Your screen should appear similar to the one below.
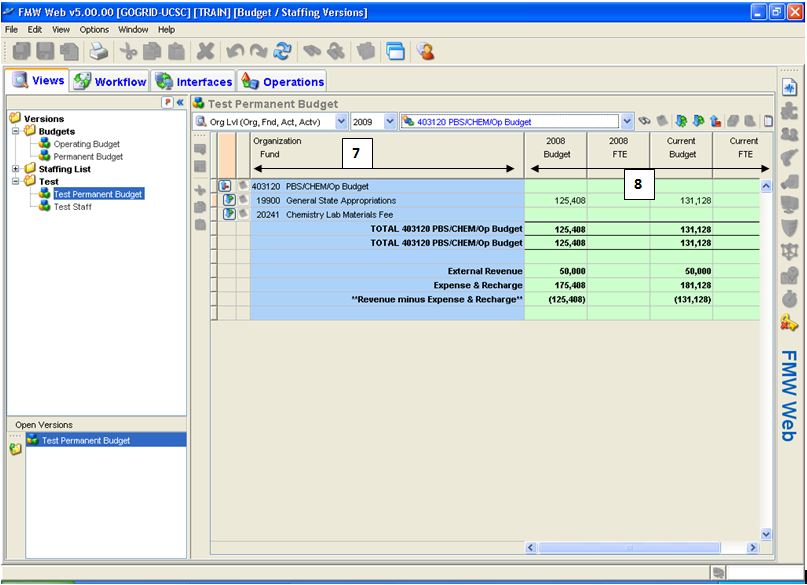
Note that the Current Budget and Current FTE data columns refer to the year selected, in this case, year 2009. Most permanent budget views provide prior year budget and FTE balances as well, in this case, year 2008.
If we’re interested in greater detail on the Current Budget and FTE figures on 403120-19900, we can go to the left of the record and click on the Expand icon ![]() . This action will drill-down to the next level of detail. To collapse the lines, click the Collapse icon to the left of the line
. This action will drill-down to the next level of detail. To collapse the lines, click the Collapse icon to the left of the line ![]() , see (1) below. Alternatively, rather than expanding/collapsing one data record path at a time, you can utilize the Expand/Collapse icons on the balance view toolbar, see (2) below.
, see (1) below. Alternatively, rather than expanding/collapsing one data record path at a time, you can utilize the Expand/Collapse icons on the balance view toolbar, see (2) below.
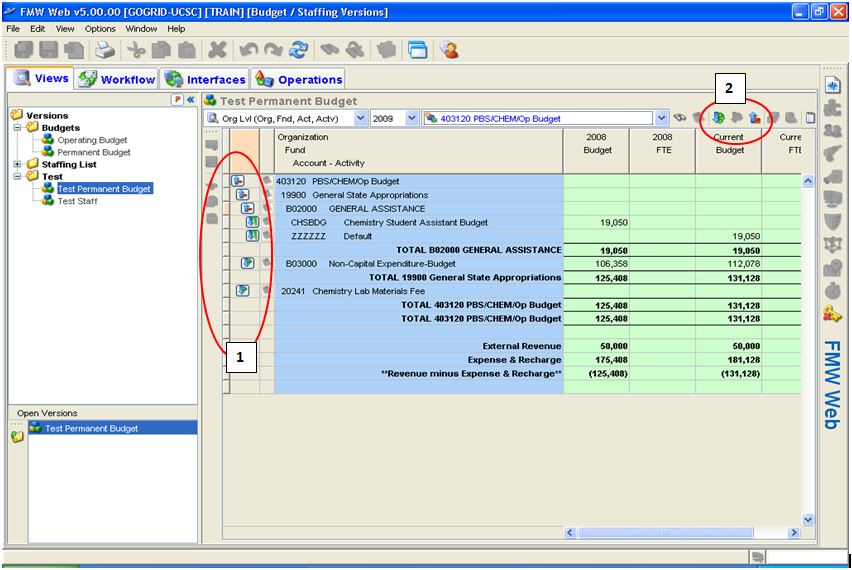
Note that a default/blank/null Activity code is denoted by ‘ZZZZZZ’
A Drill down to line items icon ![]() indicates the existence of detailed permanent budget transaction line items. Example: Activity CHSBDG, see below.
indicates the existence of detailed permanent budget transaction line items. Example: Activity CHSBDG, see below.
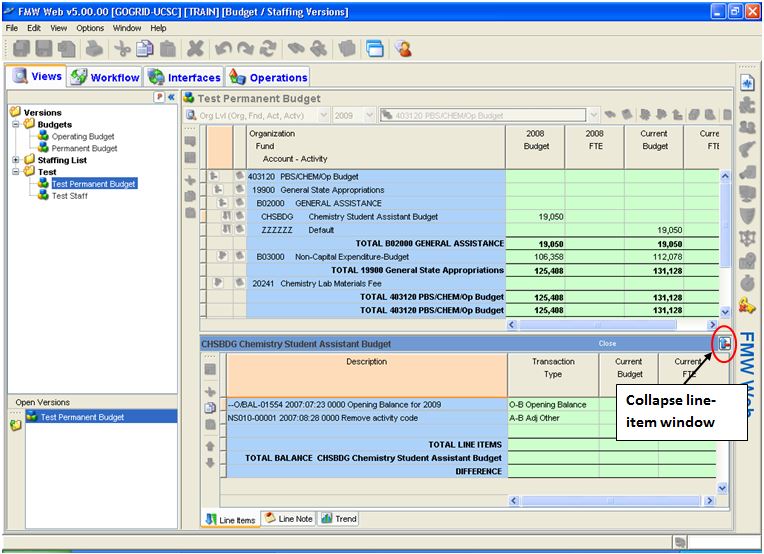
At the line item level, we see that the opening balance for year 2009, $19,050, is equal to the ending balance for year 2008. We also see that the sum of the detailed transactions is equal to the current budget for year 2009. The ‘Item Description’ is deciphered in the following manner:
NS010-00001 2007:08:28 0000 Remove activity code
J/e Ref- J/e line # Date: YYYY/MM/DD Title Code J/e Description
Note that a default/blank/null Title code is denoted by ‘0000’.
We’ll discuss FMW transaction codes (BSL transaction type and class) when we get to permanent budget journal entries, but we can see that these also appear at the transaction line-item level.
Close the line-item window by clicking the ![]() in the upper right corner of this window.
in the upper right corner of this window.
Let’s say that we’re now interested in determining the origin of the year 2008 balance on 19900-403120-B02000-CHSBDG. On the permanent budget balance view select year 2008 and again drill-down to the line-item level using the ![]() icon to the left of record 19900-403120-B02000-CHSBDG as shown below.
icon to the left of record 19900-403120-B02000-CHSBDG as shown below.

Note that the printing function ![]() is enabled on the balance view but not the drill-down line-item views. Users can manipulate column widths prior to printing so as to maximize the quality of the print job. The print date is indicated on the Editing view printout.
is enabled on the balance view but not the drill-down line-item views. Users can manipulate column widths prior to printing so as to maximize the quality of the print job. The print date is indicated on the Editing view printout.
Journal Entries
From the balance view of the Test Permanent Budget, you may navigate to the Journal Entry screen via the ‘Switch to Journal Entry’ ![]() icon on the far right of the balance view toolbar. Alternatively, you may access the Journal Entry screen by right-clicking the Test Permanent Budget within the versions navigation pane and selecting ‘Journal Entry’.
icon on the far right of the balance view toolbar. Alternatively, you may access the Journal Entry screen by right-clicking the Test Permanent Budget within the versions navigation pane and selecting ‘Journal Entry’.
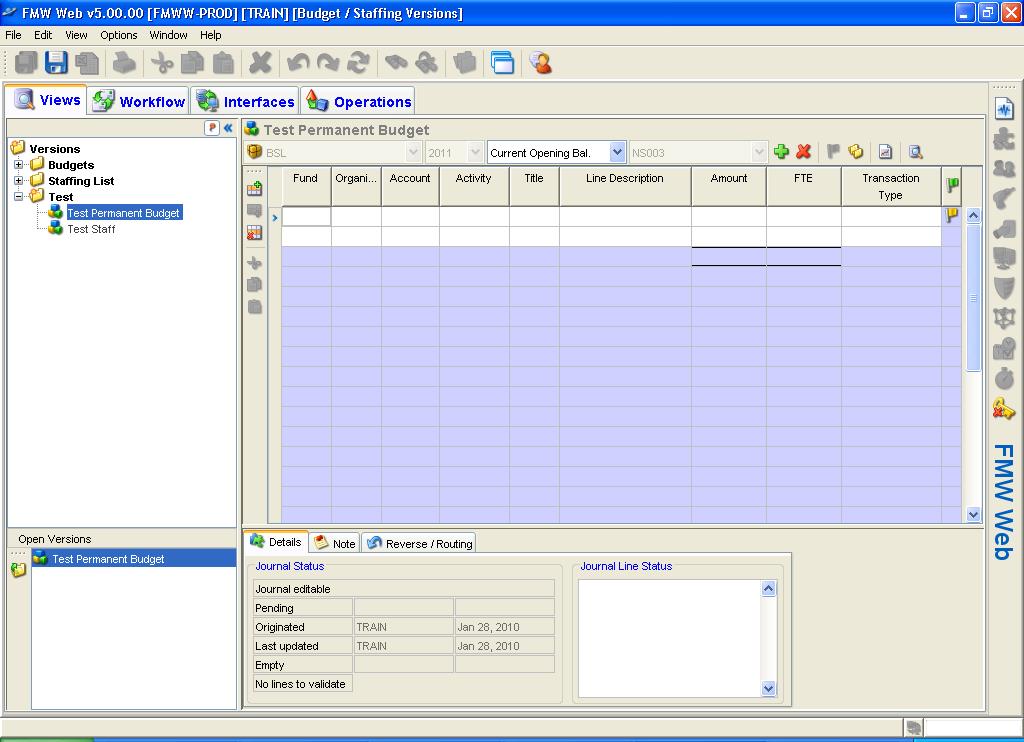
Every time you enter the Journal Entry screen the last journal, alphabetically, entered will be displayed. Your Journal Entry screen should look similar to that below.
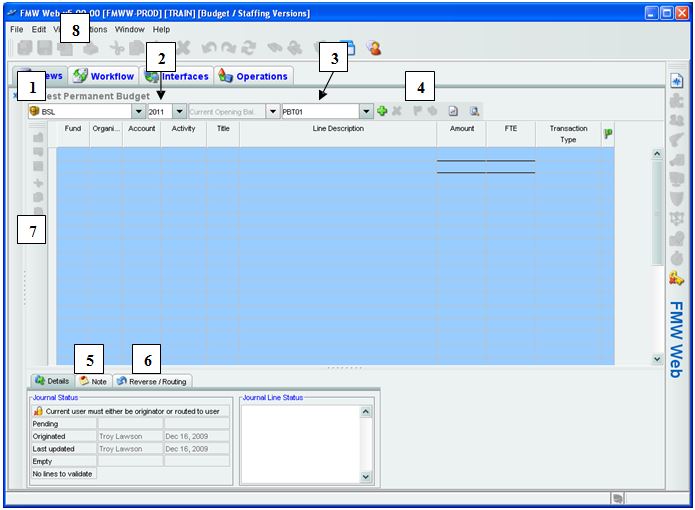
Tour of the Journal Entry screen:
1. Class – ‘BSL’ (Budget System Local) is your only choice, so you don’t have to be concerned about this drop-down box.
2. Year – The Journal Entry function will only allow permanent budget transactions to be performed on the current permanent budget year. However, you may wish to select a prior year when researching the details of a prior year Journal Entry.
3. Journal Entry Reference – The combo-box provides a complete list of all pending and posted journal entries by all users. Users are required by policy to use their unit’s two character alpha code followed by three alpha/numeric characters. For instance, NS001 is a valid Journal Entry reference number for a Physical and Biological Sciences Division user. Journal Entry Reference may be recycled from year to year, but must be unique within a given year. A user may view any Journal Entry, but is prevented from modifying any posted Journal Entry and any pending Journal Entry initiated by another user.
4. Journal Entry toolbar:
![]() Create Journal – Icon used to initiate a new journal and assign the journal ID using the standards described #3 above.
Create Journal – Icon used to initiate a new journal and assign the journal ID using the standards described #3 above.
![]() Delete Journal –Icon used to delete a journal that has not been posted.
Delete Journal –Icon used to delete a journal that has not been posted.
![]() Post Journal – Icon is used to post a permanent budget transaction. The minimum requirements that enable this button to “attempt” to post a transaction are 1) the Journal Entry has been saved since the last modification, and 2) the amount column sums to zero.
Post Journal – Icon is used to post a permanent budget transaction. The minimum requirements that enable this button to “attempt” to post a transaction are 1) the Journal Entry has been saved since the last modification, and 2) the amount column sums to zero.
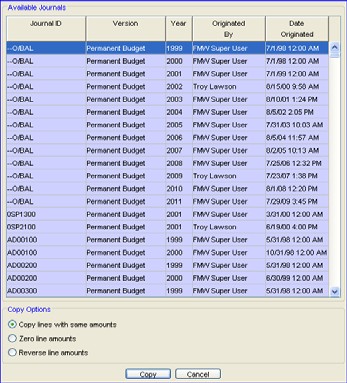
![]() Copy Lines From Another Journal – Icon allows the copying of a previously posted journal entry with either zero amounts, reversed amounts, or the same amounts. This is useful when essentially the same journal needs to be processed with possibly different amounts. Clicking on this icon will bring up a list of all posted journals from all years. (See below) Use the column headers to sort the journals. Select the Journal you wish to copy and how you want the amounts to appear. Note that if a user does not have security access to all copied lines, a red flag will appear at the end of the corresponding line in the journal.
Copy Lines From Another Journal – Icon allows the copying of a previously posted journal entry with either zero amounts, reversed amounts, or the same amounts. This is useful when essentially the same journal needs to be processed with possibly different amounts. Clicking on this icon will bring up a list of all posted journals from all years. (See below) Use the column headers to sort the journals. Select the Journal you wish to copy and how you want the amounts to appear. Note that if a user does not have security access to all copied lines, a red flag will appear at the end of the corresponding line in the journal.
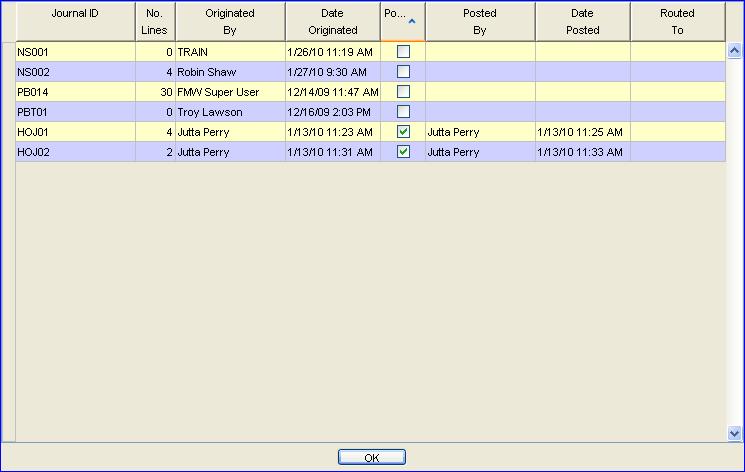
![]() Journal Listing – Click on this icon for the Journal listing screen to appear (see below). Use this icon to monitor journal status (pending/posted). Click on the headers to sort. It is highly recommended for users to periodically review this listing to identify pending journals that may have been overlooked. Sorting by the ‘Posted Flag’ column makes this easy to do.
Journal Listing – Click on this icon for the Journal listing screen to appear (see below). Use this icon to monitor journal status (pending/posted). Click on the headers to sort. It is highly recommended for users to periodically review this listing to identify pending journals that may have been overlooked. Sorting by the ‘Posted Flag’ column makes this easy to do.
![]() Switch to View. Clicking this icon will bring you to the balance view screen
Switch to View. Clicking this icon will bring you to the balance view screen
5. Notes tab. Select this tab to either view or add a Journal Entry description. Users are required by policy to provide a clear and concise Journal Entry description. Descriptions are limited to 255 characters. Note that special characters (e.g. ‘@’ symbol) do not print within the Journal Entry description.
6. Reverse / Routing tab. Select this tab to route your journal. Please note that the Reverse Journal function is not activated and is unavailable for use. If a user does attempt to use the reversing journal entry feature, the journal entry editing process will nullify the reversal. See below for detailed view of Reverse/Routing tab.
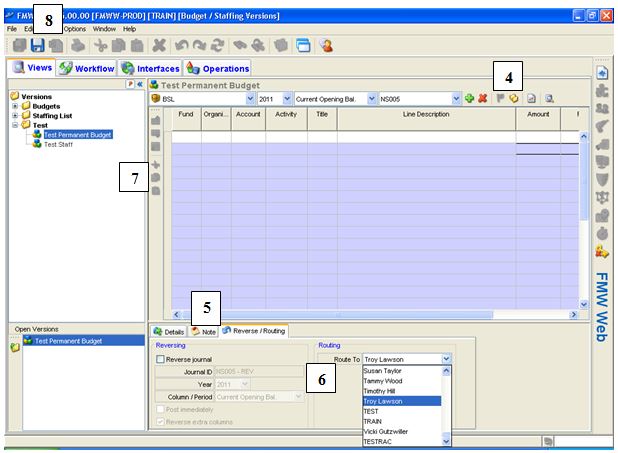
The Routing feature allows a user to reassign a journal to another FMW Web user. When a journal is reassigned to another user, the user who originated the journal gives up all rights to the journal, and an email is automatically generated notifying the recipient user of the reassignment. This feature may be used to allow one user to enter a journal and another to ultimately complete and/or post the journal.
7. ![]() Delete Row – Icon used to delete unwanted individual journal lines.
Delete Row – Icon used to delete unwanted individual journal lines. ![]() Add Row Above/Below – Icon used as one means to add a Journal transaction line. This feature inserts a line above the line that contains a selected cell.
Add Row Above/Below – Icon used as one means to add a Journal transaction line. This feature inserts a line above the line that contains a selected cell.
Technically not on the Journal Entry screen, but integral to completing a permanent budget transaction
8. ![]() Icon used to save Journal Entry, a basic requirement prior to posting
Icon used to save Journal Entry, a basic requirement prior to posting
![]() Print Icon-allows user to print Journal Entry.
Print Icon-allows user to print Journal Entry.
Now let’s try a permanent budget transaction. Be sure that you have the current year selected. Click on the ![]() icon to create a new journal. Enter your journal number. If the number you entered already exists, a message will pop up that the Journal ID already exists. You may click on the Journal Entry reference box and locate the next consecutive number, NS003 for user TRAIN. If you don’t find any, simply type in a Journal Entry reference - for instance, SN001 for Summer Session. After typing in a Journal Entry reference number, click on the first blank Journal Entry transaction line.
icon to create a new journal. Enter your journal number. If the number you entered already exists, a message will pop up that the Journal ID already exists. You may click on the Journal Entry reference box and locate the next consecutive number, NS003 for user TRAIN. If you don’t find any, simply type in a Journal Entry reference - for instance, SN001 for Summer Session. After typing in a Journal Entry reference number, click on the first blank Journal Entry transaction line.
The permanent budget element columns (Fund, Organization, Account, Activity and Title) all appear on the Journal Entry screen. In order to enter/modify an element cell, users may type over an element cell or right-click within an element cell, and select ‘choose item…’ to get a list of valid values. The element cells are case-sensitive, so if you type b08000 as the account, you’ll encounter problems. Note that the null values for Activity and Title, ‘ZZZZZZ’ and ‘0000’ respectively, are populated in the absence of “real” values.
Users navigate the columns and rows of the Journal Entry screen via their mouse, tab or arrow keys. Beware that when you are on the last transaction line of a Journal Entry the arrow-down key produces a duplicate Journal Entry transaction line, as does tabbing beyond the FTE data column. Use the ![]() icon to remove unwanted transaction lines.
icon to remove unwanted transaction lines.
FMW Web requires users to properly code their transactions. Click in the Transaction Type cell to view the drop-down list containing the various codes listed with descriptions that are for the most part self-explanatory. A few clarifications:
- ‘A’ (Adjustment) type entries are permanent budget transactions made to the current permanent budget year (i.e. 2011) that also have a current year operating budget (i.e. 2010) component. For instance, a 10/1/2009 staff equity requires a 12 month costing in the 2011 permanent budget and a 9 month costing in the 2010 operating budget. One would use transaction code ‘A-9 Adj Equity/ASH’. ‘A’ (Adjustment) type transaction can be done at anytime of the year.
- ‘I’ (Increment) type entries are permanent budget transactions made to the current permanent budget year (i.e. 2011) that have no impact on the current year operating budget (i.e. 2010). For instance, a unit revising its permanent revenue income estimate for FY 2010-2011 would utilize transaction code ‘I-B Incr Other’. ‘I’ (Increment) type transactions can only be performed after the 3/31/xx campus’ permanent budget file has been submitted to the Office of the President. The FMW Web Administrator will notify users when ‘I’ transactions can begin.
- Multiple transaction codes can appear on the same journal; however, the journal must balance by transaction code.
Please try to limit your transaction line descriptions to no more than 25-30 characters. Keep in mind the longer the description, the more difficult it will be to read in both the line-item level of the permanent budget version and reports.
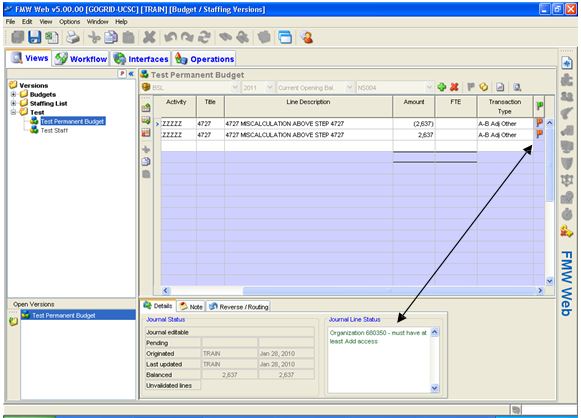
When a user navigates out of a cell of a given journal transaction line, a first level edit occurs checking whether the user has security access to the elements included on that line. If you typed b08000 (using a lower case ‘b’) for the account code or typed in another unit’s organization code, you will get a red flag at the end of the corresponding line as well as an explanation of the issue in the Journal Line Status box at the bottom of the screen. See below.
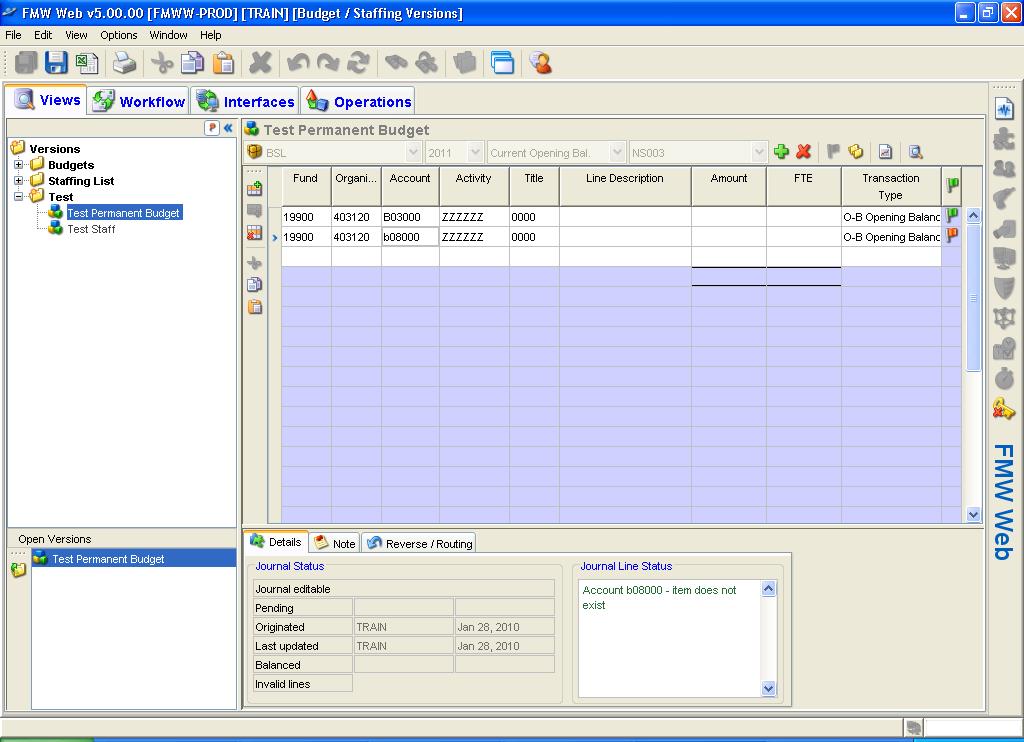
Note that the element cells on the Journal Entry screens are either white or colored (which color is dependent on user preference settings). White cells mean that you can enter data. If you were to bring up a posted Journal or another user’s pending Journal, all cells would appear to you as colored. You have no ability to edit colored cells.
The amount column accepts whole dollar amounts; negative amounts are preceded by a ‘-‘ sign. The FTE column accepts up to two decimal points; negative FTE is preceded by a ‘-‘ sign.
A very simple Journal, NS003, is shown below. Journal Entry notes have been made, the journal has been saved ![]() , notice the Post Journal
, notice the Post Journal ![]() icon is enabled – FMW will allow TRAIN to “attempt” to post this journal. We’ll try to post this journal by clicking the posting icon.
icon is enabled – FMW will allow TRAIN to “attempt” to post this journal. We’ll try to post this journal by clicking the posting icon.
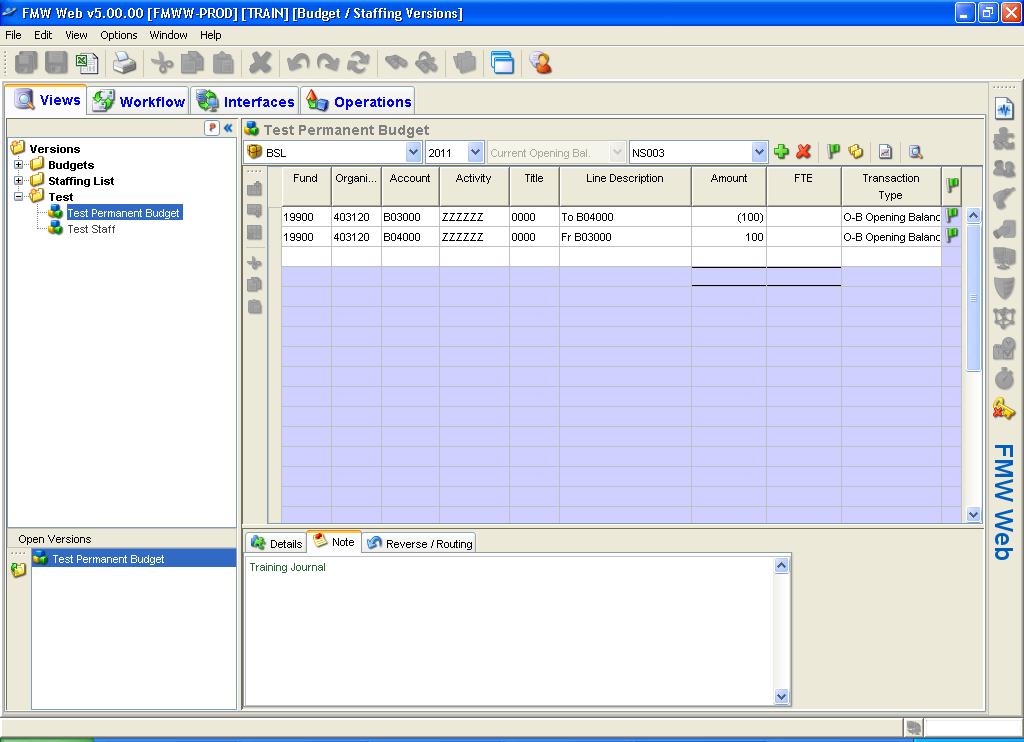
The following Journal Edit Error message appears (yes, adjustment is spelled incorrectly). TRAIN received this message because Journal NS003 used an invalid transaction code, ‘O-B Opening Balance’.
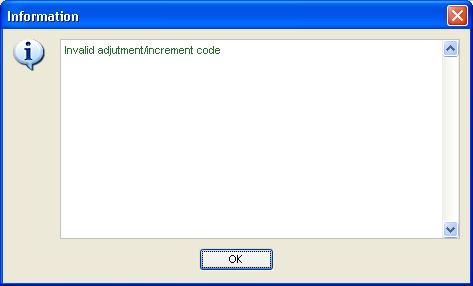
Upon attempting to post, FMW runs the journal entry transactions through a second level of system maintained business rule edits. When a user encounters a journal edit error message, the user must acknowledge the error by clicking ‘OK’, go back and correct the pending journal, re-save and attempt to post again. When the journal satisfies all of the system maintained edit rules, the journal will successfully post, and the user will receive the following message.

Click ‘OK’ to acknowledge the successful posting of the journal. Upon successful posting, the permanent budget transaction is immediately reflected in the permanent budget version (both balance and line-item detail level), the staffing version and all reports.
Switch back to the balance view of the Test Permanent Budget version by clicking on the ![]() icon. We will drill down to the line-item detail for record 19900-403120-B04000-ZZZZZZ, using the
icon. We will drill down to the line-item detail for record 19900-403120-B04000-ZZZZZZ, using the ![]() icon to see the just completed Journal, NS003.
icon to see the just completed Journal, NS003.
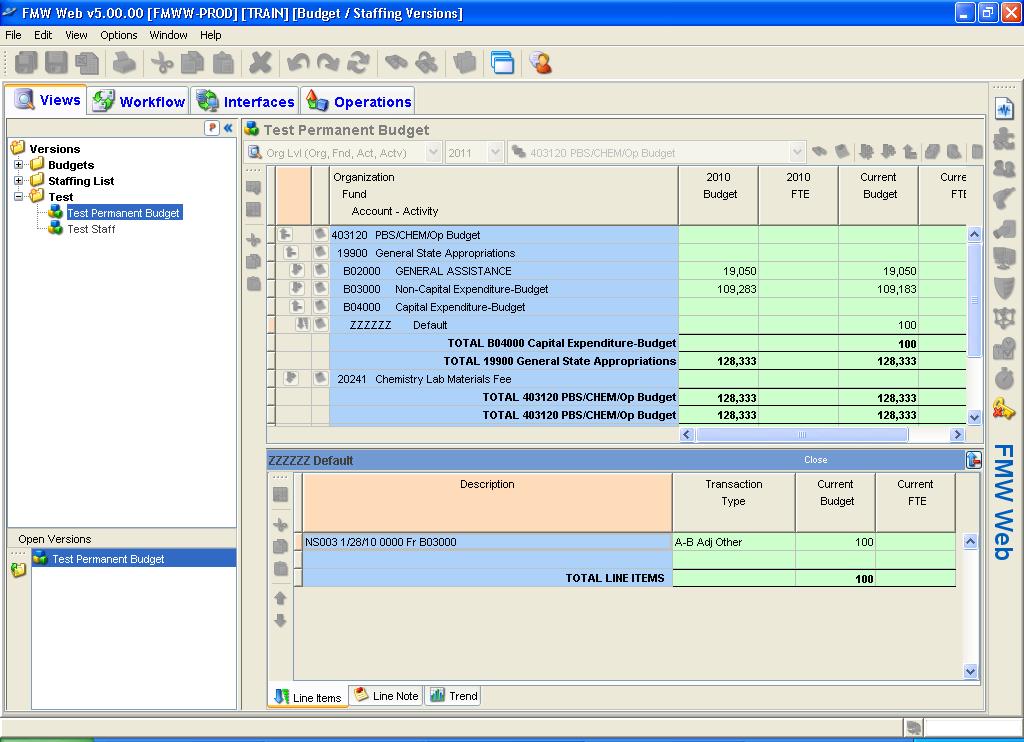
Close the line-item detail window.
Now that we’ve completed an example of what might be considered the easiest permanent budget transaction possible, let’s jump to an example of what will be arguably the trickiest type of permanent budget transaction, a transaction involving benefit budgeting for net increases of FTE.
To return to the Journal Entry screen click on the ![]() icon.
icon.
In the Journal Entry screen, make sure the current permanent budget year (i.e. 2026) is selected and assign a Journal ID, PR004 (for this example). Single-click on the first journal transaction line. Enter a two line Journal using any funds to fund the creation of 1.00 FTE for a _Assistant III new hire. However, before you post the journal, benefits for the newly created FTE must be budgeted for. An additional line should be added to account for benefits using account code B06000. Enter a journal description and save the journal. The posting icon should now be enabled and your screen should appear similar to the screen below.
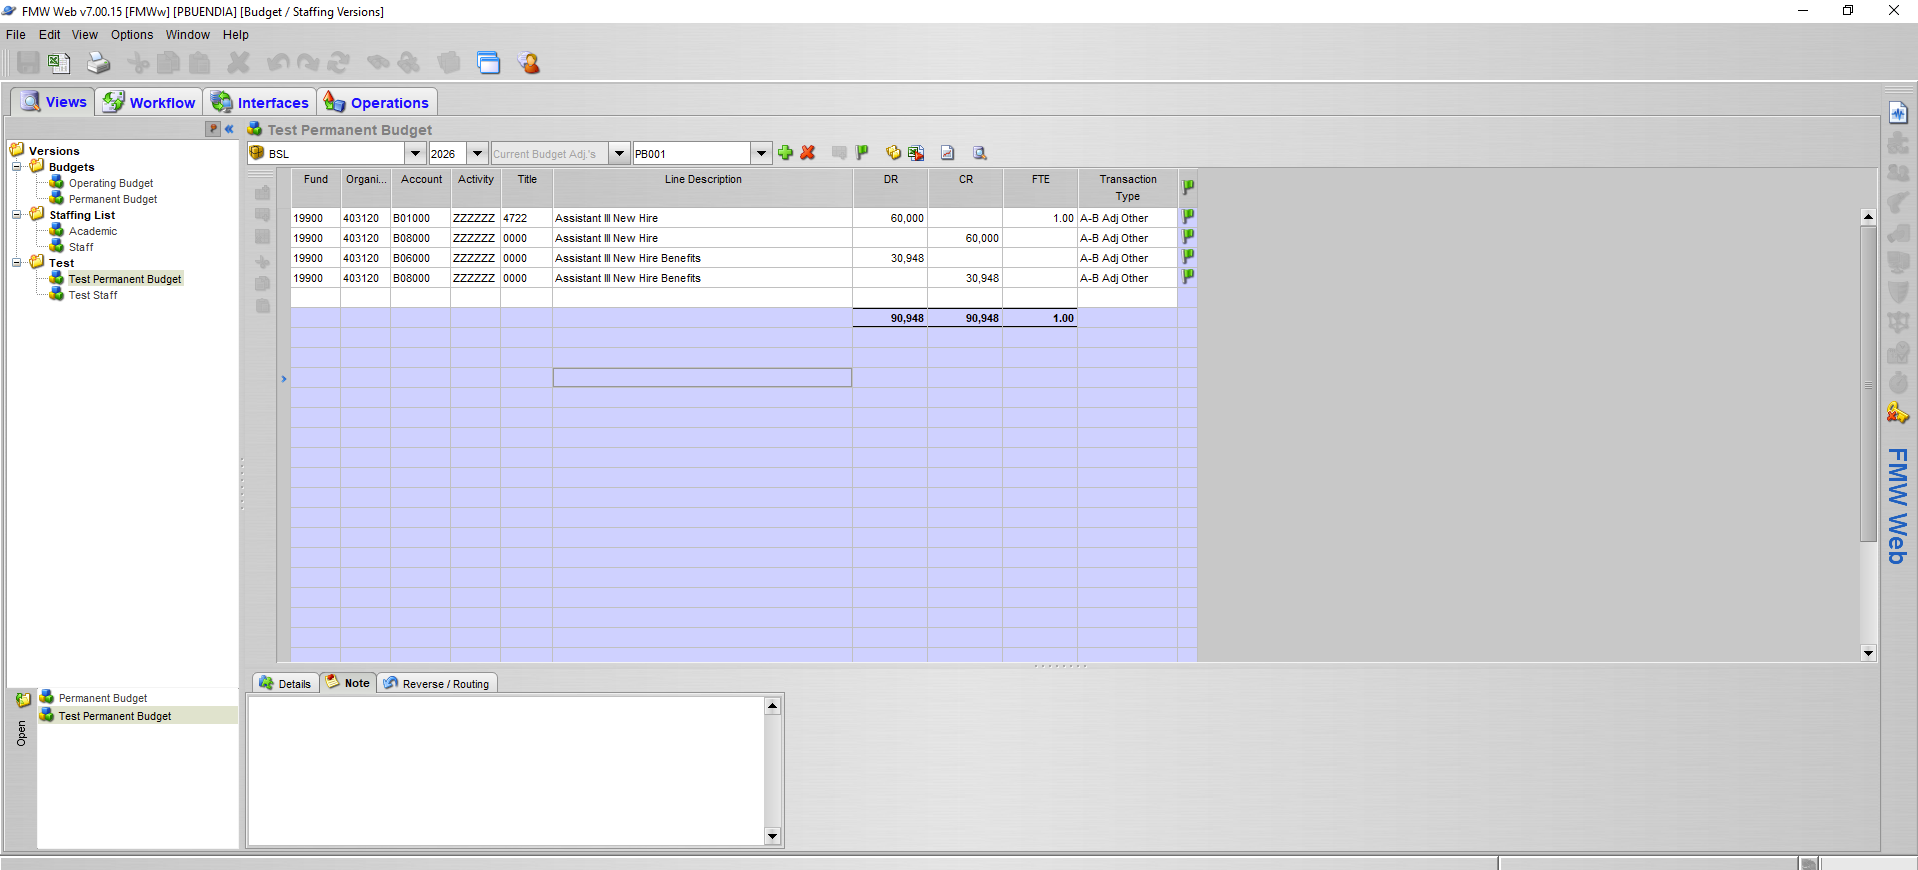
Assuming you have no edit errors present,when you now click on the posting icon , the journal should post successfully. (The posting icon looks like this: ![]() )
)
FMW Web maintains a number of journal edits preventing users from making many mistakes; however, Planning and Budget holds users responsible for the following:
- The journal ID is to be the unit’s two character alpha code followed by three alpha/numeric characters.
- Journal Notes are required and need to be clear and concise.
- A journal containing a divisional collection center organization code 8015xx shall only contain salary related transactions.
- A journal should be budgeted for benefits when there is a net increase in FTE.
